Desserts & Baking
Banoffee Pie Recipe: Layers of Toffee, Banana & Cream
Learn how to make authentic banoffee pie with buttery crust, dulce de leche toffee, fresh bananas, and whipped cream. Perfect dessert!
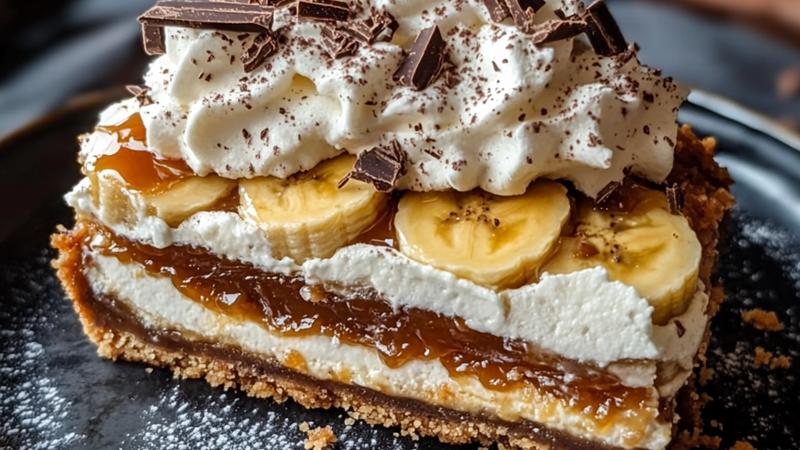
What is Banoffee Pie?
When I first discovered banoffee pie, I was absolutely captivated by its simplicity and elegance. This British dessert is a relatively modern creation, invented in the 1970s at a restaurant in East Sussex, England. The name itself is a delightful portmanteau of ‘banana’ and ‘toffee,’ which perfectly describes its two star ingredients. What makes banoffee pie so special is how it brings together contrasting textures and flavors—the crispy, buttery crust, the rich and creamy toffee layer, the fresh sweetness of bananas, and the light, airy whipped cream on top. It’s a dessert that feels indulgent yet surprisingly approachable to make at home. The beauty of this pie is that it requires no baking of the filling itself, making it perfect for warm weather when you don’t want to heat up your kitchen. I love serving it at dinner parties because it always impresses guests, yet the preparation is straightforward enough that I’m not stressed in the kitchen.
Why You’ll Love This Banoffee Pie Recipe
I’ve made this banoffee pie recipe countless times, and each time I’m reminded of why it’s such a beloved dessert. First, the flavor combination is absolutely irresistible—the buttery, caramel-like toffee pairs beautifully with the natural sweetness of ripe bananas, while the whipped cream adds a cooling, luxurious element that prevents the dessert from being too heavy. Second, the texture contrast is phenomenal. You get the satisfying crunch of the biscuit crust, the smooth creaminess of the toffee, the soft freshness of the bananas, and the pillowy whipped cream. It’s a complete sensory experience. Third, this recipe is genuinely achievable for home bakers of all skill levels. There’s no complicated technique, no temperamental pastry dough to work with, and no need for special equipment. The most technical part is making the toffee layer, but even that is just a matter of stirring and watching the color change. Finally, I love that this dessert is versatile. You can dress it up for a formal dinner party or keep it casual for a family gathering. It’s equally at home on a picnic blanket or a fancy dessert table.
Tips for Perfect Banoffee Pie Every Time
Over the years, I’ve learned several tricks that help me make the most perfect banoffee pie. First, invest in good-quality digestive biscuits—they make a noticeable difference in the final crust. British brands like McVitie’s are worth seeking out if you can find them. Second, when making the toffee layer, use medium-low heat and stir constantly. This prevents the mixture from burning and ensures even cooking. I always watch for the color to deepen gradually from light caramel to a rich golden-brown. Third, don’t skip the cooling step for the toffee layer. It needs to be completely set before you add the bananas, or the layers will mix together. Fourth, choose bananas that are ripe but still firm—they should be yellow with just a few brown speckles. Bananas that are too green won’t have enough sweetness, while overripe ones will be mushy. Fifth, prepare the whipped cream just before assembling the pie. Whipped cream can weep and separate if it sits too long, so timing is important. Finally, chill the finished pie for at least 15-20 minutes before serving. This helps all the layers set slightly and makes slicing much cleaner.
Variations and Flavor Twists
While the classic banoffee pie is perfection as-is, I love experimenting with variations. One of my favorite twists is adding a layer of dark chocolate between the toffee and bananas—simply spread a thin layer of melted dark chocolate over the cooled toffee, let it set, then add the bananas. This adds a sophisticated bittersweet note that balances the sweetness beautifully. Another variation I enjoy is using salted caramel instead of regular toffee, which adds an extra dimension of flavor. Some people like to add a splash of rum or bourbon to the toffee layer for an adult version. I’ve also made it with a coconut cream layer instead of whipped cream for a tropical twist, and it’s absolutely delicious. For a more indulgent version, you can add a thin layer of chocolate ganache on top of the whipped cream. If you want to make it vegan, you can use vegan butter for the crust and toffee, and coconut cream whipped with a bit of powdered sugar for the topping. The possibilities are really endless, and I encourage you to get creative and make it your own.
Serving and Storage Suggestions
Banoffee pie is best served chilled, straight from the refrigerator. I like to slice it into 8 generous pieces, though you can cut smaller slices if you prefer. The pie is rich and satisfying, so a smaller slice often feels indulgent. For serving, I recommend having a hot, damp cloth nearby to wipe your knife between cuts—this keeps the slices looking neat and prevents the cream from smudging. Banoffee pie is best enjoyed within 2-3 hours of assembly, while everything is at its freshest. However, if you have leftovers, you can store them in an airtight container in the refrigerator for up to 1 day. The crust will soften slightly as it absorbs moisture from the other layers, but it will still be delicious. I don’t recommend freezing the assembled pie because the whipped cream and bananas don’t freeze well and will become mushy when thawed. If you want to prepare components ahead, you can make the crust and toffee layer up to 2 days in advance and store them separately in the refrigerator, then assemble with fresh bananas and whipped cream when ready to serve.

Ingredients
Crust
Toffee Layer
Filling & Topping
Instructions
Prepare the Crust
I always start by preheating my oven to 350°F (175°C). Crush the digestive biscuits into fine crumbs—I find the easiest way is to place them in a food processor or seal them in a bag and crush with a rolling pin. Mix the crumbs with melted butter and sugar until the texture resembles wet sand. Press this mixture firmly into a 9-inch (23cm) pie dish, making sure to cover the bottom and sides evenly. Bake for 8-10 minutes until lightly golden, then remove and let cool completely. This step is crucial because it helps the crust hold together and gives it a slightly crispy texture.
Make the Toffee Layer
While the crust cools, I prepare the toffee filling. In a medium saucepan over medium-low heat, combine the sweetened condensed milk, butter, and golden syrup. Stir constantly for about 5-7 minutes until the mixture becomes thick, smooth, and caramel-colored. The key here is patience—don't rush this step or turn up the heat too high, as the mixture can burn. Once it reaches a deep golden-brown color and has thickened considerably, remove from heat and stir in the vanilla extract and sea salt. Let it cool for 2-3 minutes, then pour the toffee onto the cooled crust, spreading it evenly with a spatula. Refrigerate for at least 30 minutes until the toffee layer is completely set.
Prepare the Bananas
About 15 minutes before serving, I slice the bananas into thin, even rounds—roughly 1/4-inch (6mm) thick. I immediately toss them with fresh lemon juice to prevent browning and to add a subtle brightness that balances the richness of the toffee. Arrange the banana slices in a single, slightly overlapping layer over the set toffee. This timing is important because bananas can become mushy if they sit too long, and you want them to have a fresh, firm texture when you serve the pie.
Whip the Cream
In a large mixing bowl, I combine the heavy whipping cream, powdered sugar, and vanilla extract. Using an electric mixer or whisk, beat the mixture until stiff peaks form—this usually takes about 2-3 minutes with an electric mixer. Be careful not to overbeat, as this can turn the cream into butter. The cream should be fluffy, smooth, and hold its shape beautifully. I like to taste a small spoonful to ensure the sweetness is to my liking before spreading it over the bananas.
Assemble the Pie
Spread or dollop the whipped cream evenly over the banana layer, creating gentle peaks and swirls with the back of a spatula or the back of a spoon. This not only looks beautiful but also adds a lovely textural contrast. Work gently to avoid pressing down on the bananas. If you prefer a more rustic look, you can simply spoon dollops of cream across the top.
Garnish and Chill
Using a vegetable peeler or microplane, create dark chocolate shavings over the top of the pie. I sprinkle a tiny pinch of sea salt over the chocolate to enhance the flavors and add sophistication. Refrigerate the finished pie for at least 15-20 minutes before serving. This helps the layers set slightly and makes slicing cleaner. The pie is best enjoyed within 2-3 hours of assembly, while the crust is still crispy and the bananas are fresh.
Slice and Serve
To slice the pie cleanly, I use a sharp knife dipped in hot water and wiped dry between each cut. This prevents the cream from sticking to the blade and creates beautiful, neat slices. Each slice should showcase all the gorgeous layers—the golden crust, rich toffee, fresh banana, and fluffy cream. Serve immediately and watch your guests' faces light up!
Nutrition Information
Per serving (serves 8). Values are approximate.
| Calories | 420 calories |
| Total Fat | 24g |
| Saturated Fat | 14g |
| Carbohydrates | 48g |
| Sugar | 38g |
| Protein | 4g |
| Sodium | 280mg |
| Fiber | 1g |
* Percent Daily Values are based on a 2,000 calorie diet. Your daily values may be higher or lower depending on your calorie needs. Nutritional information is an estimate and may vary.
Never Miss a Recipe
Join 5,000+ home cooks and get new recipes straight to your inbox.
Frequently Asked Questions
Can I make banoffee pie ahead of time?
The crust and toffee layer can be made up to 2 days ahead and stored in the refrigerator. However, I recommend adding the bananas and whipped cream no more than 2-3 hours before serving. This keeps the crust crispy and the bananas fresh. If you need to make it further ahead, assemble everything except the bananas and cream, then add those final layers just before serving.
What if I don't have digestive biscuits?
You can substitute with graham crackers, vanilla wafers, or even Oreos (without the cream filling). The texture might vary slightly, but the pie will still be delicious. Use about the same weight of crumbs and follow the same method. I've also made it with crushed shortbread cookies for a richer flavor.
Can I use store-bought dulce de leche instead of making toffee?
Absolutely! If you want to save time, a 14-ounce jar of dulce de leche works perfectly as a substitute for the homemade toffee layer. Simply spread it over the cooled crust and refrigerate until set. The flavor will be slightly different—store-bought versions are often a bit less buttery—but it's still delicious and cuts your prep time significantly.
How do I prevent the bananas from browning?
The lemon juice is your best friend here! The acidity prevents oxidation and keeps the bananas looking fresh and bright. I always toss the banana slices in lemon juice immediately after slicing. If you're making the pie a bit ahead, you can also brush the toffee layer with a thin coating of lemon juice before adding the bananas, which creates an extra barrier.
Can I freeze banoffee pie?
I don't recommend freezing the assembled pie because the whipped cream and bananas don't freeze well. However, you can freeze the crust and toffee layer separately for up to 1 month. Thaw in the refrigerator and add fresh bananas and whipped cream when ready to serve. This is actually a great time-saver if you're planning ahead!

Hi, I'm Lisa!
I create simple, tested recipes from around the world that anyone can make at home.
Learn More →Reader Reviews
Based on 256 reviews
Leave a Review
You Might Also Like
Desserts & Baking
Scoopable Brown Butter Chocolate Chip Cookies
Desserts & Baking
Lemon Ricotta Pancakes with Blueberry Sauce
Desserts & Baking
Brown Butter Strawberry Baked Oatmeal Recipe
Desserts & Baking