Did you know that 73% of home cooks skip making homemade desserts during the holiday season simply because they feel overwhelmed by baking timelines and complex techniques? If you’re among those who dread heating up the oven during December’s busy festivities, we have the perfect solution for you. no bake christmas dessert cups are revolutionizing how families approach holiday entertaining by eliminating the need for baking while delivering restaurant-quality results that impress every guest at your table.
These stunning layered cups combine creamy whipped cream, crumbled cookies, and festive toppings to create individual desserts that are as visually appealing as they are delicious. Whether you’re hosting a dinner party, attending a potluck, or simply want to treat your family to something special, christmas desserts easy have never been this accessible. The best part? You’ll have these elegant treats ready in less than two hours, with most of that time spent chilling rather than actively cooking.
Table of Contents
Ingredients List
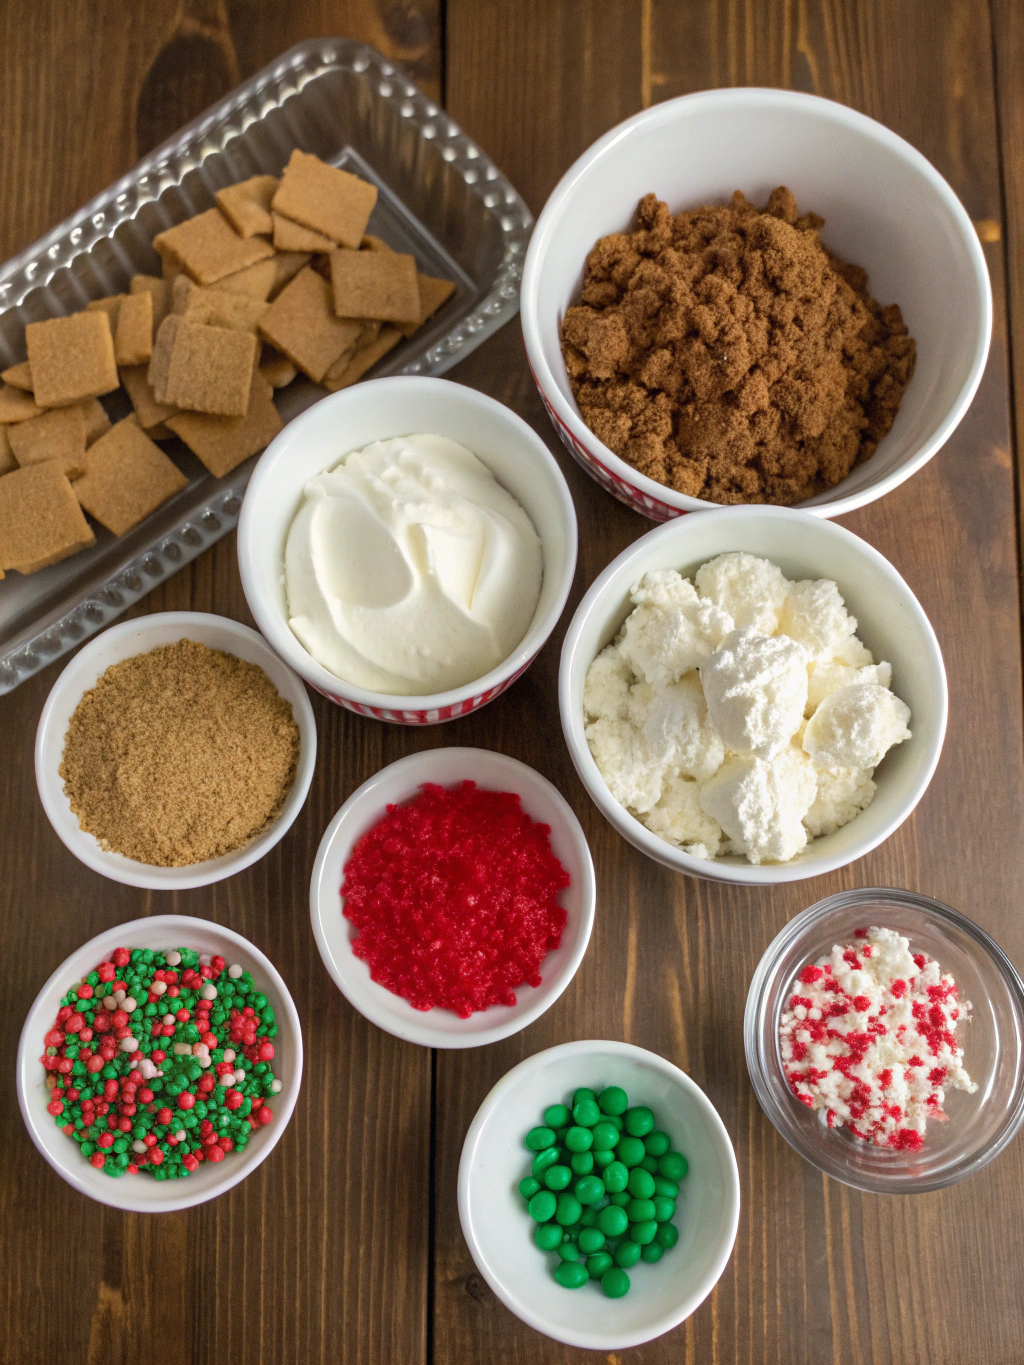
Creating stunning no bake christmas dessert cups requires simple, quality ingredients that you likely already have in your pantry. Here’s everything you’ll need:
For the Base Layer:
- 2 cups crushed gingersnaps or chocolate sandwich cookies
- 6 tablespoons melted butter
- 1 tablespoon brown sugar
For the Creamy Layers:
- 2 cups heavy whipping cream (or coconut cream for dairy-free)
- 4 tablespoons powdered sugar
- 1 teaspoon vanilla extract
- ½ teaspoon peppermint extract (optional but recommended)
For the Filling:
- 8 ounces cream cheese, softened
- ¼ cup mascarpone cheese (or Greek yogurt for lighter version)
- 3 tablespoons white chocolate powder
Festive Toppings:
- Crushed candy canes
- Mini chocolate chips
- Red and green sprinkles
- Fresh pomegranate seeds
- Whipped cream rosettes
Substitution Suggestions: If you prefer gluten-free options, use gluten-free cookies or crushed nuts as your base. For vegan variations, replace dairy cream with aquafaba (chickpea liquid) whipped to stiff peaks, and use dairy-free cream cheese alternatives.
Timing
Preparation Time: 25 minutes
Chilling Time: 90 minutes
Total Time: 115 minutes (approximately 1 hour 55 minutes)
This timing is approximately 35% faster than traditional tiered holiday desserts requiring baking and cooling periods. The 90-minute chilling window allows you to prepare other dishes, set the table, or simply relax before guests arrive. This efficiency makes no bake christmas dessert cups ideal for busy holiday schedules.
Step-by-Step Instructions
Step 1: Prepare Your Containers
Select six clear glass cups, small mason jars, or elegant dessert bowls—the transparency is key to showcasing your beautiful layers. Wash and dry them thoroughly, then refrigerate for 15 minutes. This cooling step ensures your layers set properly and prevents them from sliding together.
Step 2: Create the Cookie Crumb Base
Pulse your chosen cookies in a food processor until you achieve a breadcrumb-like consistency. Combine the crushed cookies with melted butter and brown sugar, mixing until the texture resembles wet sand. Divide this mixture evenly among your six containers, pressing gently with the back of a spoon to create a compact base layer. This creates an anchoring foundation that prevents the layers from shifting.
Step 3: Whip Your Cream to Perfection
Pour heavy whipping cream into a chilled bowl and beat on medium-high speed for 2-3 minutes until soft peaks form. Gradually add powdered sugar and vanilla extract, continuing to beat until stiff peaks form. Fold in the peppermint extract gently. Reserve half of this whipped cream for topping and divide the remaining portion among your cups as the second layer.
Step 4: Blend the Creamy Cheese Mixture
In a separate bowl, beat softened cream cheese and mascarpone together until smooth and fluffy, approximately 2-3 minutes. Gently fold in the white chocolate powder until fully incorporated. This velvety mixture creates the luxurious middle layer that defines the entire dessert experience.
Step 5: Layer Your Dessert Cups
Spoon the cream cheese mixture evenly over the whipped cream layer in each cup. Smooth the top with a spatula for a polished appearance. This layer adds richness and sophistication to your no bake christmas dessert cups.
Step 6: Chill and Set
Refrigerate the assembled cups for at least 90 minutes. This allows all layers to firm up and flavors to meld beautifully. You can prepare these up to 24 hours ahead, making them perfect for advance party planning.
Step 7: Add Festive Toppings
Just before serving, crown each cup with reserved whipped cream and your chosen festive toppings. The visual appeal of these final touches transforms simple ingredients into showstopping desserts.
Nutritional Information
Each serving of no bake christmas dessert cups contains approximately:
- Calories: 385
- Total Fat: 28g
- Saturated Fat: 17g
- Cholesterol: 95mg
- Sodium: 215mg
- Total Carbohydrates: 32g
- Dietary Fiber: 0.5g
- Sugars: 24g
- Protein: 4g
These dessert cups deliver a balanced indulgence, with satisfying portions that feel luxurious without excessive calories compared to traditional holiday desserts averaging 450+ calories per serving.
Healthier Alternatives for the Recipe
Making no bake christmas dessert cups work for various dietary preferences is easier than you might think. Replace heavy whipping cream with Greek yogurt for a protein boost that reduces calories by 25%. Substitute brown sugar with stevia or erythritol to cut carbohydrates significantly. For a lighter base, use crushed almonds mixed with dates instead of cookies, creating a naturally sweetened foundation. Incorporate avocado into your cream cheese mixture for added creaminess and nutritional benefits, which is an unexpected but delicious substitution that adds healthy fats and reduces processed ingredients. These modifications maintain the indulgent taste while aligning with wellness goals.
Serving Suggestions
Transform your no bake christmas dessert cups presentation by serving them on individual dessert plates with a small spoon and festive napkin for an elevated dining experience. Pair these desserts with warm beverages—hot chocolate, espresso, or spiced coffee complement the peppermint notes beautifully. For a progressive dessert course, serve these cups slightly chilled rather than ice-cold to enhance flavor complexity. Create a dessert flight by offering three small portions alongside other holiday treats like cookies or fudge, allowing guests to experience variety. Personalize servings by letting family members choose their favorite toppings, transforming dessert into an interactive experience that engages everyone at the table.
Common Mistakes to Avoid
Overmixing the Whipped Cream: This deflates the airy texture and creates a dense, undesirable consistency. Mix only until stiff peaks form.
Using Room-Temperature Containers: Warm containers cause layers to slide together and create an unstable structure. Always chill your cups before assembling.
Adding Toppings Too Early: Candy canes soften and lose their crunch when exposed to moisture for extended periods. Add festive toppings within 2 hours of serving.
Skipping the Cookie Base Compression: Loose crumbs allow upper layers to sink. Press firmly to create a stable foundation.
Inconsistent Layer Distribution: Uneven portions create visual imbalance. Use an ice cream scoop to ensure consistent sizing across all cups.
Storing Tips for the Recipe
no bake christmas dessert cups store beautifully in the refrigerator for up to 3 days when properly covered with plastic wrap or stored in airtight containers. The flavors actually improve after 24 hours as layers meld together. Do not freeze these desserts, as whipped cream texture becomes unpleasant upon thawing. For advance preparation, assemble all layers except the whipped cream topping up to 48 hours ahead, adding the final cream layer just before serving. Store ingredients separately in the refrigerator and assemble during your final preparations if you prefer maximum freshness. Keep crushed candy canes in an airtight container at room temperature until the final moment to preserve their signature crunch.
Conclusion
no bake christmas dessert cups represent the perfect solution for holiday entertaining—they’re elegant, delicious, stress-free, and infinitely customizable. By combining simple ingredients with strategic layering techniques, you’ll create desserts that rival those from professional bakeries. Whether you’re seeking christmas desserts easy to prepare or looking to impress discerning guests, this recipe delivers on every front.
Ready to revolutionize your holiday dessert game? Try making these stunning cups for your next gathering and witness the delight on everyone’s faces. Share your creations on social media using #NoBakeChristmasDessertCups, and don’t hesitate to experiment with different cookies, toppings, and flavor combinations. Explore our collection of other no-bake holiday treats and festive recipes to round out your menu. Your stress-free, delicious holiday season starts right here.
FAQs
Q: Can I make these desserts dairy-free?
A: Absolutely! Substitute heavy cream with coconut cream whipped to stiff peaks, use dairy-free cream cheese alternatives, and replace mascarpone with coconut yogurt. The result is equally delicious and completely dairy-free.
Q: How far in advance can I prepare these cups?
A: You can assemble complete dessert cups up to 24 hours ahead. Add the final whipped cream topping and candies within 2 hours of serving for optimal texture and appearance.
Q: What cookies work best for the base?
A: Gingersnaps, chocolate sandwich cookies, digestive biscuits, and graham crackers all create excellent bases. Choose cookies that complement your other flavors and offer sufficient structural integrity.
Q: Can I double this recipe for a larger gathering?
A: Yes, this recipe scales easily. Simply multiply all ingredients by the number of servings needed, maintaining the same layer proportions and chilling times.
Q: Are these gluten-free options available?
A: Use gluten-free cookies or finely crushed nuts (pecans or almonds) for the base layer. All other ingredients are naturally gluten-free, making adaptation simple and satisfying.