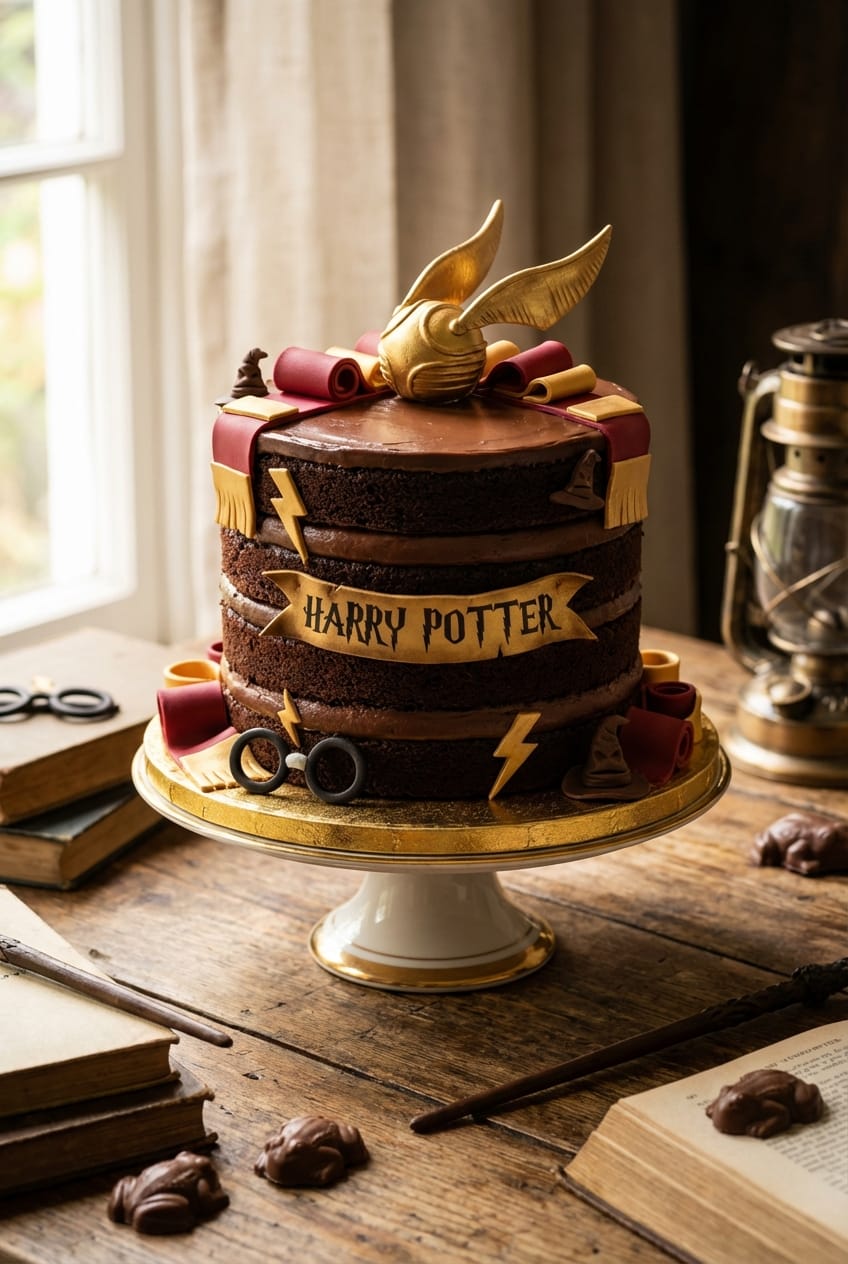
Picture this: your Harry Potter fan’s eyes lighting up as they see their dream birthday cake – layers of rich chocolate magic topped with golden snitches and house colors. Harry Potter birthday cake brings the wizarding world to life in the most delicious way possible. In under 2 hours (including cooling time), you’ll create a show-stopping centerpiece that tastes as magical as it looks. This isn’t just cake. It’s an edible portal to Hogwarts that makes any celebration unforgettable.
Whether you’re celebrating a first-year witch or wizard, hosting a themed party, or simply honoring a Potterhead, this Harry Potter birthday cake delivers both visual wow-factor and incredible flavor. The moist chocolate layers pair perfectly with silky frosting, while themed decorations transform it into something truly special. No professional baking degree required – just a love for magic and a willingness to create memories.
Ingredients
Quality ingredients create the foundation for magical results. Use Dutch-process cocoa for deeper chocolate flavor, and ensure eggs and buttermilk are room temperature for the smoothest batter.
For the Chocolate Cake
- 375g (3 cups) all-purpose flour
- 400g (2 cups) granulated sugar
- 75g (¾ cup) Dutch-process cocoa powder
- 2 teaspoons baking soda
- 1 teaspoon baking powder
- 1 teaspoon salt
- 3 large eggs, room temperature
- 240ml (1 cup) buttermilk, room temperature
- 240ml (1 cup) hot coffee (or hot water)
- 120ml (½ cup) vegetable oil
- 2 teaspoons vanilla extract
For the Chocolate Frosting
- 340g (1½ cups) unsalted butter, softened
- 600g (5 cups) powdered sugar
- 100g (1 cup) Dutch-process cocoa powder
- 80ml (⅓ cup) heavy cream
- 2 teaspoons vanilla extract
- ¼ teaspoon salt
For Decorations
- Red and gold fondant (house colors)
- Golden snitch cake topper (store-bought or fondant)
- Edible gold paint or luster dust
- Black fondant for glasses and lightning bolt
- Optional: mini house banners, edible images
Smart Substitutions
No Buttermilk: Mix 240ml milk with 1 tablespoon white vinegar, let sit 5 minutes. Gluten-Free: Use 1:1 gluten-free flour blend. Dairy-Free: Substitute plant-based butter and milk alternatives. No Coffee: Use hot water (coffee enhances chocolate but isn’t tasted).
Timing
- Prep: 30 minutes
- Bake: 30-35 minutes
- Cool: 45 minutes
- Assemble/Decorate: 45-60 minutes
- Total: 2.5-3 hours
- Serves: 12-16 slices
Instructions
Step 1: Mix and Bake Chocolate Cake Layers
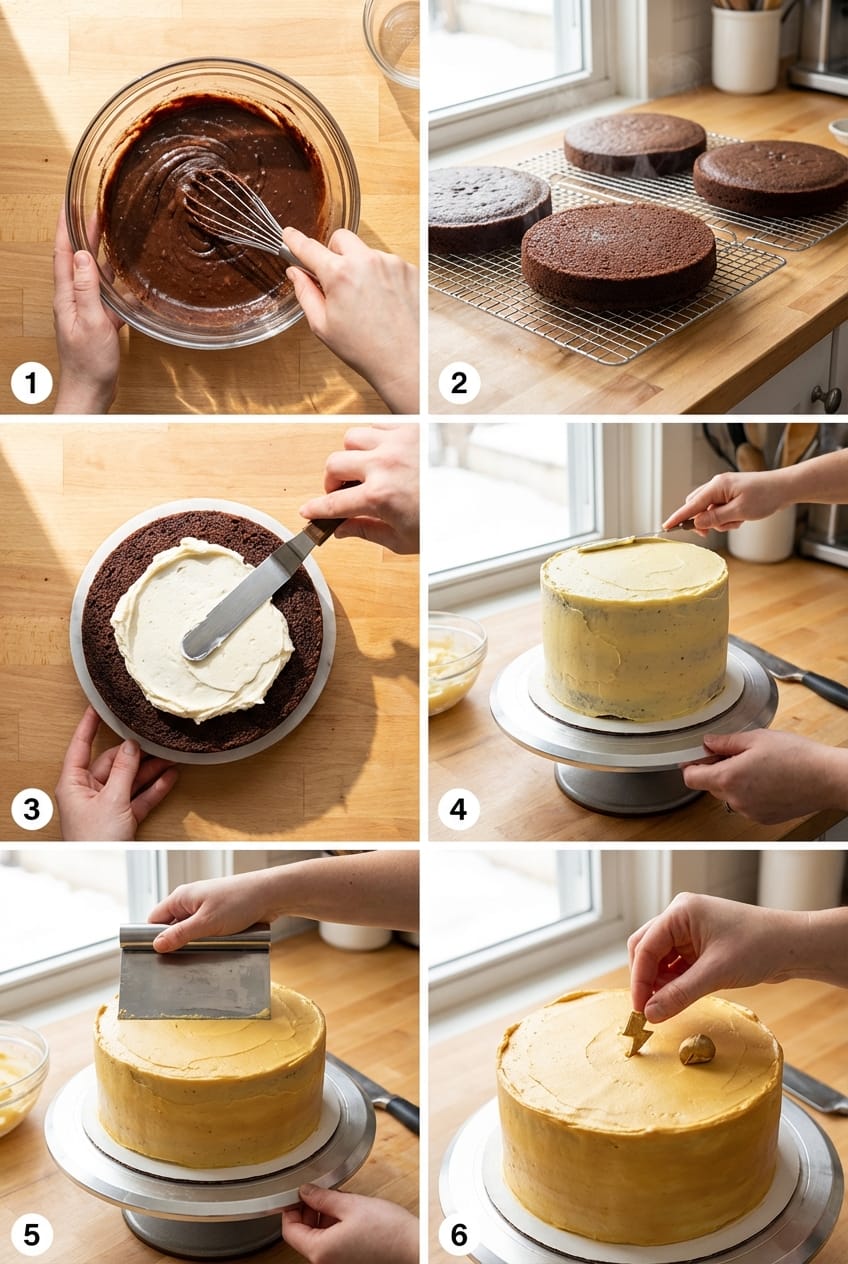
Preheat oven to 350°F (175°C). Grease and flour three 9-inch round cake pans, then line bottoms with parchment paper. In a large bowl, whisk together flour, sugar, cocoa powder, baking soda, baking powder, and salt until no lumps remain. In a separate bowl, whisk eggs, buttermilk, oil, and vanilla until smooth. Pour wet ingredients into dry ingredients and stir until just combined – don’t overmix. Slowly pour in hot coffee while stirring (batter will be thin – this is correct). Divide batter evenly among three pans. Bake 30-35 minutes until a toothpick inserted in center comes out with just a few moist crumbs. The coffee intensifies chocolate flavor without adding coffee taste, and the thin batter creates incredibly moist layers. Cool in pans 10 minutes, then turn out onto wire racks to cool completely before frosting.
Step 2: Cool Cake Layers Completely
This step requires patience but is crucial for structural success. Let cake layers cool on wire racks for at least 45 minutes – they should be completely room temperature before frosting. Warm cake will melt frosting, causing layers to slide and decorations to fail. While layers cool, you can make the frosting. To speed cooling, place wire racks in a cool area or near an open window (not in fridge, which can dry the cakes). Test by touching the bottom of the cake – if it feels even slightly warm, wait longer. Properly cooled cakes are easier to frost, stack evenly, and hold decorations perfectly. Use this time to prepare your decorating supplies and fondant pieces.
Step 3: Make Chocolate Frosting
In a large bowl with an electric mixer, beat softened butter on medium speed for 2-3 minutes until fluffy and pale. Sift together powdered sugar and cocoa powder to remove lumps. Gradually add the sugar-cocoa mixture to butter, alternating with heavy cream, beating on low speed. Add vanilla and salt. Once everything is incorporated, increase speed to medium-high and beat for 3-4 minutes until frosting is light, fluffy, and smooth. The frosting should hold stiff peaks but spread easily. If too thick, add 1 tablespoon cream at a time. If too thin, add more powdered sugar. Proper consistency is key: too stiff tears the cake, too loose won’t hold layers. Make this while cakes cool so frosting can come to perfect spreading temperature.
Step 4: Assemble and Crumb Coat Layers
Place first cake layer on a cake board or serving plate. Spread about ¾ cup frosting evenly across the top, leaving a small border (frosting will spread when compressed). Place second layer on top, press gently to secure, and repeat frosting process. Add third layer, bottom-side up for a flat top surface. Apply a thin crumb coat – a very thin layer of frosting covering the entire cake to seal in crumbs. Use an offset spatula and don’t worry about seeing cake through the frosting. Refrigerate 20-30 minutes until crumb coat is firm. This step is essential for professional-looking results: the crumb coat traps loose crumbs so your final frosting layer is smooth and pristine, not speckled with chocolate bits.
Step 5: Apply Final Frosting Layer
Once crumb coat is set, apply the final frosting layer generously. Start with the sides: hold the spatula perpendicular to the cake and spread frosting in a smooth motion, adding more as needed. Then add frosting to the top and smooth with the spatula or a bench scraper. For ultra-smooth sides, hold a bench scraper at a 45-degree angle and rotate the cake on a turntable while keeping the scraper steady. Wipe excess frosting off the scraper between passes. For a rustic look, create swoops and swirls with the back of a spoon. The generous frosting layer provides the canvas for Harry Potter decorations and ensures every bite has plenty of chocolate richness. Refrigerate 15 minutes to set before decorating.
Step 6: Add Harry Potter Decorations
Now for the magical transformation. Roll out red and gold fondant and cut into strips or shapes for Gryffindor house colors (or adapt for other houses). Apply to the cake sides or create a banner across the top. Shape black fondant into Harry’s iconic round glasses and lightning bolt scar – attach with a tiny dab of water or frosting. Place a golden snitch cake topper at the center or slightly off-center. Use edible gold paint or luster dust to add shimmer to accents. Optional: add mini house banners, edible images of the Hogwarts crest, or chocolate frogs. Get creative with the theme – this is where the cake becomes truly magical. Work quickly if the room is warm, as fondant can soften. Stand back and admire your wizarding masterpiece before serving to the birthday witch or wizard.
Nutrition Per Serving
- Calories: 520
- Protein: 5g
- Carbs: 72g
- Fat: 25g
- Fiber: 2g
- Sugar: 56g
This is celebration food meant for special occasions. The rich chocolate flavor and stunning presentation make every calorie worth it for creating magical birthday memories.
Pro Tips for Success
- Room Temperature Ingredients: Cold eggs and buttermilk don’t incorporate smoothly, creating dense texture. Let them sit out 30-60 minutes before baking.
- Don’t Overmix: Mix batter only until ingredients are combined. Overmixing develops gluten, resulting in tough, chewy cake instead of tender crumb.
- Level Your Layers: If cake layers dome during baking, use a serrated knife to carefully trim the tops flat before stacking. This creates stable, professional-looking layers.
- Chill Between Steps: Refrigerating after crumb coat and before decorating ensures frosting is firm enough to support decorations without sagging or sliding.
- Make Ahead: Bake cake layers 1-2 days ahead, wrap tightly, and store at room temperature. Frost and decorate the day of serving for best results.
- Turntable Makes It Easy: A rotating cake stand simplifies frosting and decorating dramatically. If you don’t have one, place the cake on a large inverted bowl.
Delicious Variations
- House-Specific Colors: Adapt decorations for Hufflepuff (yellow/black), Ravenclaw (blue/bronze), or Slytherin (green/silver). Use corresponding fondant colors and house crests.
- Vanilla Cake Option: Swap cocoa powder for extra flour and use vanilla cake recipe if the birthday person prefers lighter flavor. Decorations work on any base.
- Marbled House Colors: Create marble effect by swirling house-colored batters together before baking. Dramatic reveal when cake is sliced.
- Sorting Hat Cake: Shape fondant into a sorting hat topper instead of golden snitch. Add texture with a knife for fabric appearance.
- Butterbeer Filling: Add a layer of butterscotch pastry cream between cake layers for authentic Wizarding World flavor surprise.
- Cupcake Version: Bake batter in cupcake tins (18-20 cupcakes, 18-20 minutes baking time). Decorate individually with mini HP toppers for party favors.
Common Mistakes to Avoid
Frosting Warm Cake: Rushing to frost before cakes are completely cool causes frosting to melt, creating a sliding mess and compromised decorations. Solution: Wait the full 45 minutes. Touch the cake bottom – if it feels even slightly warm, wait longer. Plan timing so cooling happens naturally.
Skipping the Crumb Coat: Applying final frosting directly to bare cake pulls up crumbs, creating a messy, unprofessional appearance that ruins decorations. Solution: Always apply a thin crumb coat first, refrigerate until firm, then add the beautiful final layer. This extra 30 minutes creates magazine-worthy results.
Fondant on Soft Frosting: Placing fondant decorations on unfirmed frosting causes them to sink, slide, or lose detail. Solution: Refrigerate frosted cake 15-20 minutes before adding fondant. Firm frosting provides stable canvas for decorations.
Overmixing Batter: Mixing too vigorously or too long develops gluten, creating tough, dense cake instead of tender, moist layers. Solution: Stir just until flour disappears. Some small lumps are fine – they’ll bake out.
Uneven Frosting Layers: Different amounts of frosting between layers creates lopsided cake that tilts or collapses. Solution: Measure frosting for each layer (about ¾ cup per layer). Use an offset spatula to spread evenly from center outward.
Storage and Make-Ahead
Refrigeration: Store frosted cake covered in the refrigerator for up to 4 days. Bring to room temperature 30 minutes before serving for best flavor and texture. Fondant decorations may weep condensation when warming – gently blot if needed.
Freezing: Freeze unfrosted cake layers wrapped tightly in plastic wrap, then foil, for up to 3 months. Thaw overnight in fridge, bring to room temperature, then frost and decorate. Fully decorated cake can be frozen 1 month but fondant texture may change.
Reheating: Not recommended for frosted cake. If serving refrigerated cake, simply bring to room temperature. Individual slices can be microwaved 10-15 seconds for warm cake experience.
Make-Ahead: Bake cake layers 1-2 days ahead, wrap tightly, store at room temperature. Make frosting 1 day ahead, refrigerate, then bring to room temperature and re-whip before using. Assemble and decorate the day of or night before the party for freshest presentation.
Serving Suggestions
Complete Party Theme: Serve alongside other Harry Potter treats – chocolate frogs, Bertie Bott’s Every Flavor Beans, butterbeer, and golden snitch cake pops. Create a Hogwarts feast atmosphere with themed decorations and house banners. For more celebration ideas, check our chocolate lava cake for another magical dessert option.
Candle Placement: Use sparkler candles arranged in a circle for dramatic effect when lights are dimmed. Or spell out the birthday age using number candles in house colors.
Ceremonial Cutting: Play Harry Potter theme music when bringing out the cake. Let the birthday person use a wand-shaped cake knife for extra magic.
Accompaniments: Serve with vanilla ice cream, whipped cream, or a scoop of butterbeer-flavored ice cream. Pair with our savory dinner dishes earlier in the meal to balance sweetness.
Why This Recipe Works
The magic lies in the batter chemistry and decorating technique. Hot coffee blooms the cocoa powder, intensifying chocolate flavor without adding coffee taste. The combination of baking soda and baking powder creates optimal rise and tender crumb. Buttermilk’s acidity reacts with leaveners for extra lift while tenderizing the gluten structure. The thin batter (which seems wrong but is correct) allows ingredients to hydrate fully, creating incredibly moist texture. The two-stage frosting process – crumb coat then final layer – ensures professional results by sealing crumbs before the decorative layer. Dutch-process cocoa provides deep, complex chocolate flavor that appeals to all ages. Room temperature ingredients emulsify smoothly, creating even texture throughout. This isn’t just a decorated cake – it’s engineered for maximum moisture, flavor, and structural stability to support themed decorations.
Conclusion
This Harry Potter birthday cake is more than dessert – it’s an experience that transports Potterheads straight to the Great Hall. With rich chocolate layers, silky frosting, and magical themed decorations, you’ve created the centerpiece of an unforgettable celebration. Whether you’re celebrating a first-year or seasoned wizard, this cake delivers both visual impact and incredible flavor. Grab your mixing bowl, channel your inner house-elf, and create some birthday magic. The birthday witch or wizard will remember this cake for years to come, and you’ll earn top marks in Charms class.
FAQs
Can I make this cake in advance?
Yes. Bake cake layers 1-2 days ahead, wrap tightly, and store at room temperature. Frost and decorate the day of or night before serving. Fully assembled cake keeps refrigerated for up to 4 days.
What if I don’t have three 9-inch pans?
Bake in two pans and slice each layer horizontally to create four thinner layers. Or bake in batches, cleaning and reusing pans. Just ensure all layers are the same thickness for stability.
Can I use a different frosting?
Absolutely. Swiss meringue buttercream, cream cheese frosting, or vanilla buttercream all work beautifully. Just ensure it’s firm enough to support decorations. Avoid whipped cream frosting – too soft for stacking.
How do I create fondant decorations if I’m not experienced?
Start simple: cut basic shapes with cookie cutters or a knife. Use pre-made fondant shapes and toppers from cake supply stores. YouTube tutorials show step-by-step techniques. Practice on parchment paper first.
My cake layers are domed – what do I do?
Use a long serrated knife to carefully trim the domes flat before stacking. This creates level, stable layers. Save the trimmed cake pieces for snacking or making cake pops.
Can I make this gluten-free?
Yes. Use a 1:1 gluten-free flour blend designed for baking (like Bob’s Red Mill or King Arthur). Follow the recipe exactly otherwise. The cake may be slightly denser but still delicious.
The frosting is too soft – how do I fix it?
Refrigerate for 15-20 minutes to firm up. If still soft, beat in additional powdered sugar 2 tablespoons at a time until it holds shape. Ensure butter wasn’t too warm when mixing.
What’s the easiest way to get smooth frosting?
Use a bench scraper or long offset spatula. Apply generous frosting, then hold the scraper at 45-degree angle while rotating the cake on a turntable. Wipe scraper between passes. Practice makes perfect – don’t expect perfection first time.
Can I add food coloring to the cake batter?
Yes, for house-colored cake. Add gel food coloring (not liquid) to create red/gold, blue/bronze, yellow/black, or green/silver batters. Gel won’t thin the batter like liquid coloring does.