Desserts & Baking
Classic New York Cheesecake Recipe
Master the iconic New York cheesecake with this creamy, rich recipe. Dense, velvety filling on a buttery crust. Perfect dessert every time!
Why I’m Obsessed with New York Cheesecake
When I first moved to New York City for my food studies, I had one mission: find the perfect slice of cheesecake. Junior’s in Brooklyn, Lindy’s (the original, now closed), and countless neighborhood delis all claimed fame for this iconic dessert. What struck me most wasn’t just how creamy it was—it was the restraint. No elaborate toppings, no fussy decorations. Just pure, unadulterated cream cheese perfection balanced with a buttery graham cracker crust.
That simplicity inspired me to master the recipe at home. After dozens of iterations—some with cracks like the San Andreas Fault, others dense as hockey pucks—I finally cracked the code (no pun intended!). The secret lies not in exotic ingredients but in understanding the science: proper temperature management, a water bath, the right oven timing, and patience. So much patience.
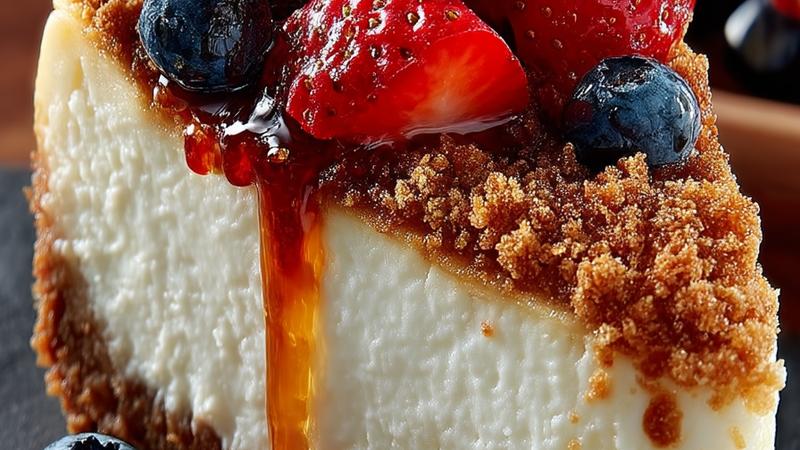
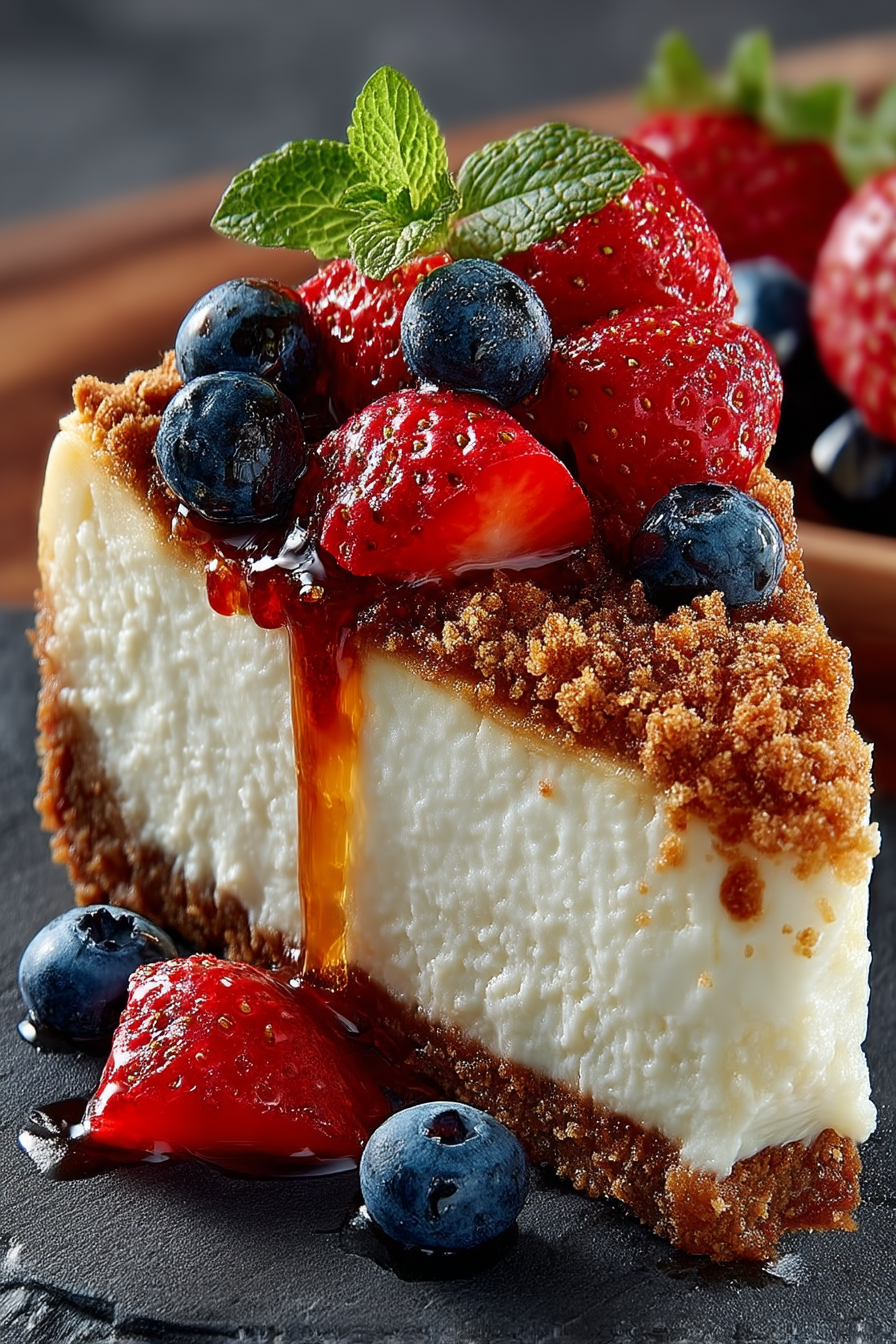
What makes New York cheesecake truly special is its texture. It’s not fluffy or whipped; it’s dense, creamy, and rich—almost velvety on your tongue. Each bite reveals the pure cream cheese flavor enhanced by a whisper of vanilla and bright lemon zest. It’s sophisticated yet comforting, elegant yet utterly approachable.
The Art of the Perfect Crust
The foundation of any great cheesecake is its crust, and in New York tradition, that means graham crackers and butter. I know some people get fancy with chocolate graham crackers or add nuts, but there’s wisdom in tradition. The graham cracker provides the perfect contrast—buttery, slightly sweet, and crispy—against the rich filling.
Here’s what I’ve learned: don’t skip the pre-baking step. Baking the crust for 8-10 minutes before adding the filling helps it set and prevents a soggy bottom. The ratio matters too—about 2 cups of crumbs to ½ cup of butter creates that ideal texture. You want it to hold together when pressed, not crumbly, not overly wet. I pulse my graham crackers in a food processor until they’re fine breadcrumbs; it ensures even texture.
One pro tip I discovered during my testing: a tiny pinch of salt in the crust dramatically enhances the flavor. It’s barely detectable but makes the sweetness pop. The salty-sweet combination is what keeps people coming back for slice after slice.
Mastering the Cream Cheese Filling
The filling is where patience becomes your greatest ingredient. Room-temperature cream cheese is non-negotiable—I’ve made this mistake before, and the result was a lumpy, textured filling that was unpleasant to eat. Take your cream cheese out of the refrigerator 30-60 minutes before baking, depending on your kitchen temperature.
When beating the cream cheese, resist the urge to overmix. Use medium-low speed and beat just until smooth—typically 2-3 minutes. Overmixing incorporates air, which creates bubbles that expand in the oven and cause cracks. It’s the same principle as why you don’t overwork bread dough. The texture should be smooth and creamy, not fluffy or aerated.
I add a combination of flour and cornstarch to the sugar before mixing it into the cream cheese. This helps stabilize the filling and creates a structure that prevents cracking. The sour cream adds tang and richness without making the flavor overly sour—it’s about balance. Finally, the lemon juice and zest brighten the filling with subtle citrus notes that prevent the dessert from being cloying. I’ve found that these small flavor nuances elevate the entire experience.
The Water Bath Technique Explained
When I first heard about the water bath method, I thought it was overkill. Surely I could just bake the cheesecake directly in the oven? My first attempts without it were disappointingly cracked and dense. The water bath changed everything.
Here’s the science: the water surrounding the pan conducts heat more gently and evenly than dry oven air. This means the edges cook more slowly and at a lower effective temperature, preventing the outside from setting before the inside is done. This gentle cooking gives you that silky, creamy interior you’re after.
The technique is simple but requires care. Wrap your springform pan completely in heavy-duty foil before placing it in a larger roasting pan. Fill the roasting pan with hot water until it reaches halfway up the sides of the cheesecake pan. Some water might seep through if you’re not careful with the foil, but this is rare if you seal it properly. A helpful hack: pour hot water from a kettle or measuring cup gently; rushing it can crack the hot pan.
I also crack the oven door slightly during the last phase of cooling. This allows the temperature to decrease gradually rather than shocking the cheesecake with a sudden drop. It’s these small details that transform an okay cheesecake into a magnificent one.
Baking Time and Temperature: The Critical Window
Understanding when your cheesecake is done baking is crucial. Unlike cakes, which should spring back when touched, cheesecake should have a slight jiggle in the center when you shake the pan gently. The edges should be set and slightly puffed, but that 2-3 inch circle in the middle should wobble. This indicates that the carryover cooking during cooling will bring the internal temperature to the perfect doneness.
I use an instant-read thermometer for precision. Insert it into the filling about halfway between the center and edge—you’re looking for 150°F (65°C) at the edges and around 140°F (60°C) in the very center. This might seem low, but it’s exactly right for cheesecake. Trust the thermometer over your eyes.
The total bake time at 325°F (163°C) is typically 50-60 minutes, but this varies based on your oven’s accuracy, the size of your pan, and other variables. Every oven is different—mine runs about 25 degrees hot, so I check mine at 45 minutes. Start checking around the 45-minute mark. Better to pull it out a few minutes early than to overbake it.
After baking, the cooling process is equally critical. Turn off the oven and crack the door 4-5 inches open. Let the cheesecake sit in this warm, gradually cooling environment for a full hour. This gives the interior time to set slowly without the exterior cooling too quickly. Then let it rest at room temperature for another 1-2 hours before refrigerating overnight. This entire process—baking, resting, cooling, and chilling—takes about 8-10 hours but is absolutely worth the wait.
Ingredients
Crust
Filling
Water Bath & Topping
Instructions
Prepare the Pan
Preheat your oven to 325°F (163°C). Wrap the outside of a 9-inch (23cm) springform pan with heavy-duty aluminum foil, making sure to cover the bottom and sides completely. This prevents water from seeping into the pan during the water bath. Lightly grease the inside with non-stick spray.
Make the Crust
In a medium bowl, combine graham cracker crumbs, melted butter, sugar, and salt. Mix until the texture resembles wet sand. Press this mixture firmly into the bottom of your prepared springform pan, creating an even layer. Use the bottom of a measuring cup to compact it well. Bake for 8-10 minutes until lightly golden, then remove and let cool slightly while preparing the filling.
Beat the Cream Cheese
Using an electric mixer on medium-low speed, beat the room-temperature cream cheese for 2-3 minutes until it's smooth and creamy. This is crucial—cold cream cheese creates lumps. Scrape down the bowl frequently with a spatula to ensure everything is fully incorporated.
Add Dry Ingredients & Flavorings
In a small bowl, whisk together sugar, flour, cornstarch, and vanilla extract. Gradually add this mixture to the cream cheese, beating on low speed until just combined. Avoid overmixing, as this incorporates air bubbles that cause cracks. The mixture should be smooth but not fluffy.
Incorporate Eggs & Finishing Touches
Add eggs one at a time, beating on low speed after each addition just until incorporated. Mix in the sour cream, fresh lemon juice, and lemon zest until smooth and fully combined. The batter should be silky and pale. Pour this creamy filling over the cooled crust, smoothing the top with a spatula.
Set Up Water Bath
Place the foil-wrapped springform pan inside a larger roasting pan. Pour hot water into the roasting pan until it reaches halfway up the sides of the springform pan. This gentle, moist heat ensures even, slow cooking that prevents cracks and creates that signature dense, creamy texture New York cheesecake is famous for.
Bake Low & Slow
Bake for 50-60 minutes. The cheesecake is done when the edges are set but the center still jiggles slightly when gently shaken—about a 2-inch circle in the middle should wobble. The internal temperature should reach 150°F (65°C) at the edges. Don't overbake; this is the secret to a creamy interior.
Cool Completely
Turn off the oven and crack the door open 4-5 inches. Let the cheesecake rest in the warm oven for 1 hour. This gradual cooling prevents the sudden temperature change that causes cracks. Remove from oven and let cool to room temperature on the counter for another 2 hours. Then refrigerate for at least 6-8 hours, preferably overnight, before serving. The flavors deepen and the texture sets perfectly with this resting period.
Nutrition Information
Per serving (serves 12). Values are approximate.
| Calories | 425 calories |
| Total Fat | 28g |
| Saturated Fat | 17g |
| Carbohydrates | 38g |
| Sugar | 32g |
| Protein | 9g |
| Sodium | 380mg |
| Fiber | 0g |
* Percent Daily Values are based on a 2,000 calorie diet. Your daily values may be higher or lower depending on your calorie needs. Nutritional information is an estimate and may vary.
Never Miss a Recipe
Join 5,000+ home cooks and get new recipes straight to your inbox.
Frequently Asked Questions
Why did my cheesecake crack on top?
Cracks typically happen from overbaking, rapid temperature changes, or overmixing air into the batter. Use the water bath method, don't overbake (your center should jiggle slightly), and allow slow cooling by cracking the oven door. Room-temperature cream cheese also helps prevent cracks. A little sour cream in the filling makes it more forgiving!
Can I make this cheesecake ahead?
Absolutely! In fact, New York cheesecake is better made 1-2 days ahead. Once completely cooled and refrigerated, it keeps beautifully for up to 5 days covered in plastic wrap. You can also freeze it for up to 3 months—just thaw overnight in the refrigerator before serving.
Do I have to use a water bath?
The water bath is highly recommended because it provides gentle, even heat that creates that signature creamy texture. Without it, you're more likely to get cracks and an overly dense, cake-like result. However, if you must skip it, lower the oven temperature to 300°F (150°C) and bake for 60-70 minutes, watching carefully.
What's the difference between New York and other cheesecake styles?
New York cheesecake is characterized by its rich, dense, creamy filling with a pure cream cheese flavor. Unlike lighter styles (like New York deli style can be whipped), it's unadulterated—no sour cream flavoring it too much, no whipped cream. It's baked in a simple crust and relies on technique for that perfect texture.
Can I add toppings or flavoring?
Definitely! Classic toppings include fresh berries, cherry compote, or chocolate sauce drizzled on top. For flavoring, you can add 1-2 tablespoons of liqueur (like Grand Marnier), or swirl in some salted caramel or cookie butter before baking. Just don't overdo add-ins, as they can throw off the texture.

Hi, I'm Lisa!
I create simple, tested recipes from around the world that anyone can make at home.
Learn More →Reader Reviews
Based on 384 reviews