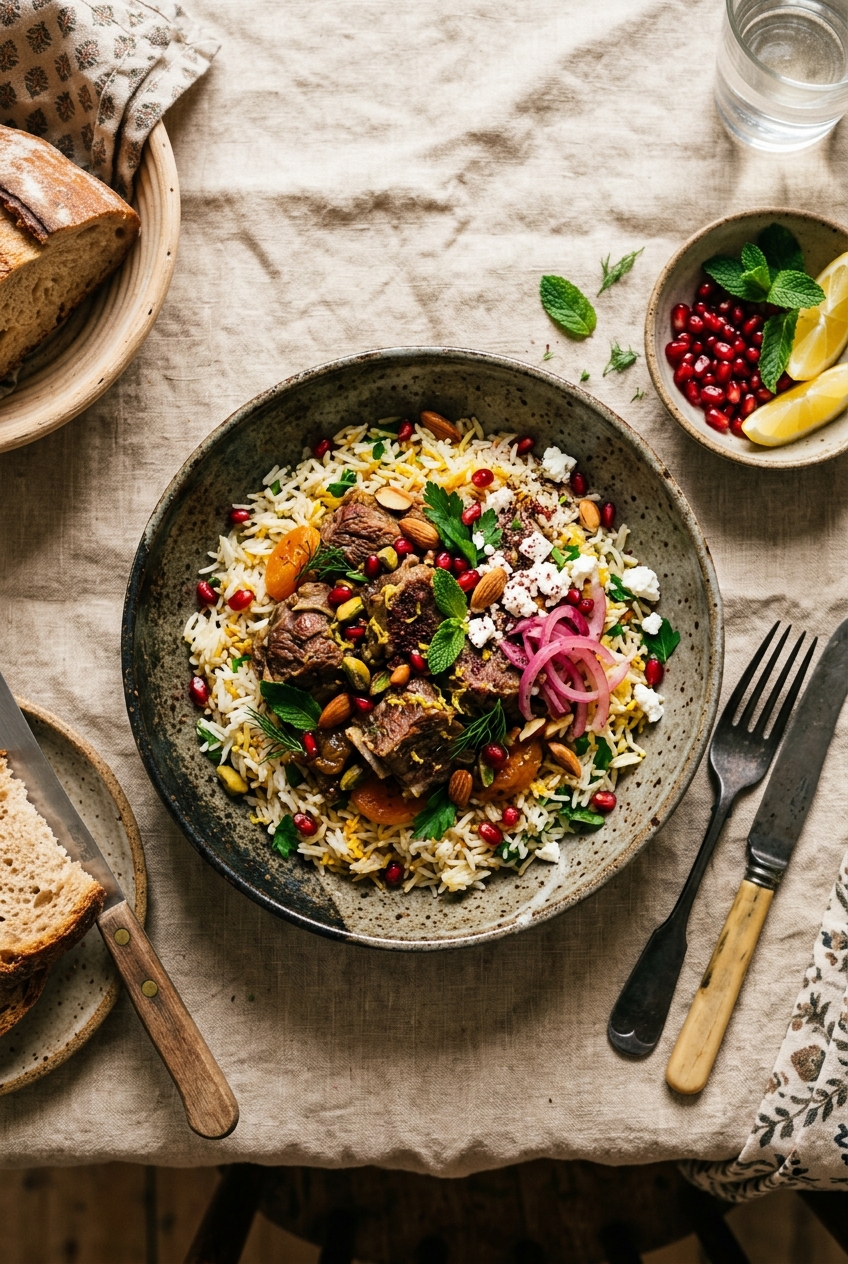
Holiday & Christmas
Classic Easter Ham Recipe with Honey Glaze
Why I Love Making Easter Ham
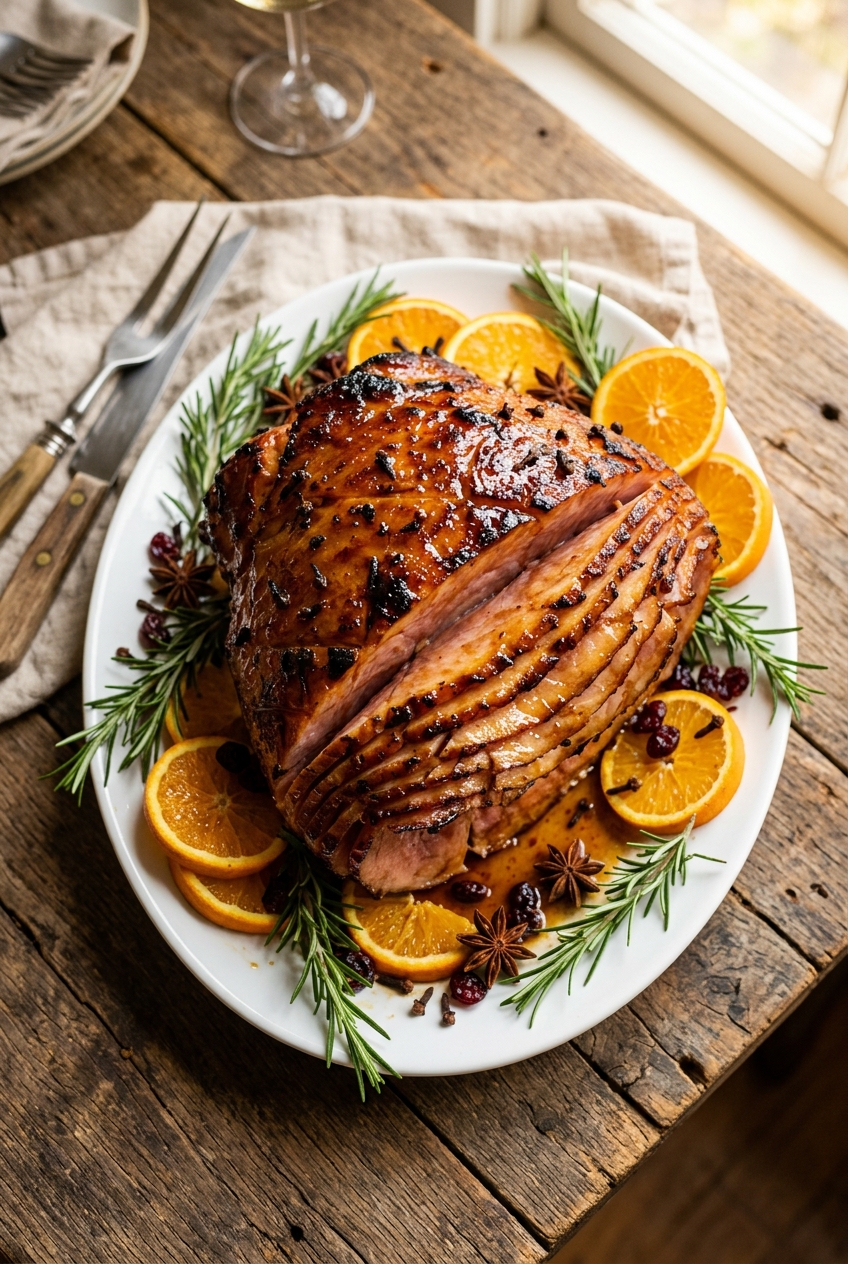
There’s something truly magical about preparing an Easter ham. When I was growing up, my grandmother would spend hours in the kitchen preparing this showstopping centerpiece, and I’d watch in fascination as she scored the surface and applied the glaze with such care. Now, as an adult who’s explored cuisines from around the world, I’ve come to appreciate how this American classic brings people together in a way few dishes can. The combination of sweet, savory, and spiced flavors speaks to our universal love of balanced, complex tastes. What I adore most is that making an Easter ham isn’t as intimidating as it might seem—it’s actually quite forgiving and incredibly rewarding. The ham does most of the work while you focus on creating that perfect glaze and managing your other side dishes. It’s the kind of recipe that makes you look like a culinary genius without requiring advanced skills.
Choosing the Right Ham
When I’m shopping for ham, I always head to the butcher counter rather than grabbing a pre-packaged option. A good butcher can help you select the perfect ham for your needs and might even offer to score it for you. Look for hams labeled ‘bone-in’ or ‘semi-boneless’ for maximum flavor. The bone contributes wonderful depth to the meat and makes for a more impressive presentation. You’ll typically find two types: spiral-cut (where the meat is already partially separated from the bone in thin slices) and regular bone-in (which requires more carving but often has better flavor). I prefer spiral-cut for Easter because it’s easier for guests to serve themselves. Make sure the ham is labeled ‘fully cooked’ unless you specifically want a fresh ham, which requires different cooking methods and longer cooking times. The label should also indicate whether it’s a smoked ham, honey ham, or regular ham—each has slightly different flavor profiles that work beautifully with this glaze.
The Science Behind the Perfect Glaze
I’m fascinated by how flavors work together, and the glaze in this recipe is a perfect example of culinary balance. The honey provides sweetness and helps create that gorgeous caramelized exterior through the Maillard reaction—the chemical process that creates brown, flavorful compounds when proteins and sugars are heated together. The brown sugar adds depth and molasses notes that honey alone can’t provide. The Dijon mustard might seem like an odd addition, but it’s crucial—it adds a subtle tanginess and helps emulsify the glaze, making it stick to the ham better. The apple cider vinegar brightens the overall flavor and cuts through the richness, preventing the dish from becoming cloying. The spices—ginger, cloves, and cayenne—add warmth and complexity. Ginger brings a subtle heat and freshness, cloves add that classic holiday aroma, and just a pinch of cayenne creates an almost imperceptible kick that makes people say ‘wow, what is that flavor?’ without being able to identify it. The butter at the end adds richness and helps the glaze coat the ham evenly. This combination of sweet, tangy, spiced, and rich creates a glaze that’s far more sophisticated than it appears.
Timing Your Easter Dinner
One of the biggest challenges with holiday cooking is timing everything so that all your dishes finish at the same time. I always work backward from when I want to serve dinner. The ham takes about 3 hours and 20 minutes total, so if you want to eat at 6 PM, you should start the ham around 2:40 PM. This gives you plenty of time to prepare other dishes. I typically start my side dishes about 45 minutes before the ham finishes cooking. Scalloped potatoes can go in the oven alongside the ham during the last 45 minutes of cooking. Vegetables like asparagus or roasted carrots can be prepared while the ham rests. Salads can be assembled ahead of time. The beauty of this ham recipe is that it doesn’t require constant attention—you’re mainly just basting every 10-15 minutes during the final glazing phase. This means you can focus on other components of your meal without stress. I always set a timer on my phone to remind me to baste, which helps me stay on track without hovering over the oven.
Serving and Presentation Tips
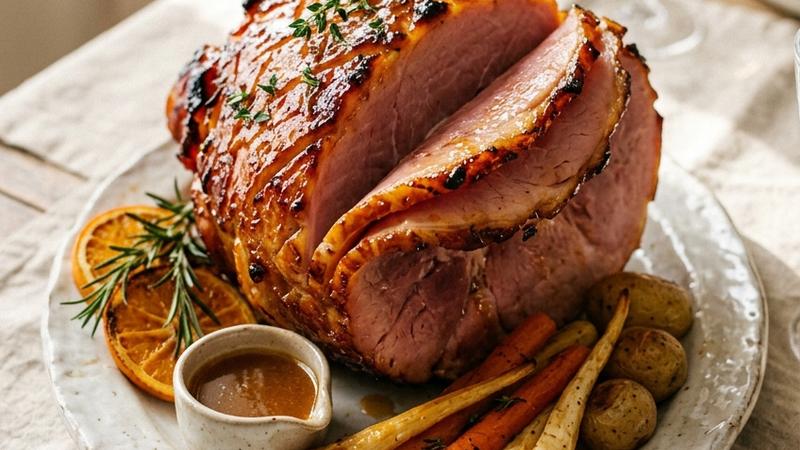
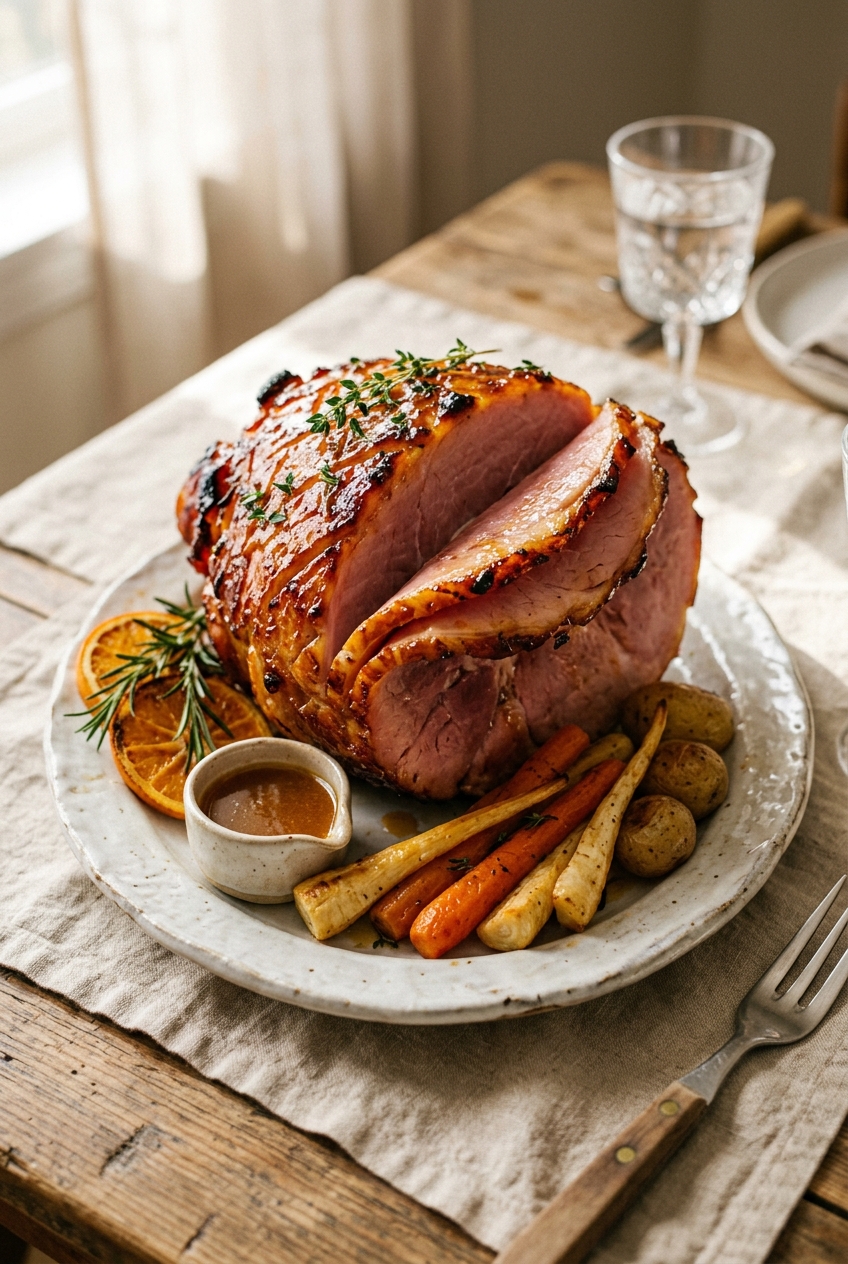
Presentation matters, especially for holiday meals. When the ham comes out of the oven with that beautiful caramelized glaze, it deserves to be showcased. I transfer it to my largest cutting board or a beautiful serving platter while it rests. If you’ve added the pineapple rings and cherries, they’ll be gorgeously caramelized and add wonderful visual appeal. For carving, I use a sharp carving knife and a carving fork to steady the ham. Slice against the grain for the most tender pieces. If it’s a spiral-cut ham, the slicing is already done for you—you just need to separate the slices. Arrange the slices on a serving platter in slightly overlapping rows, and drizzle with any remaining glaze or pan sauce. Fresh rosemary sprigs add a nice touch of color and aroma. I always serve the ham with small plates and forks so guests can easily serve themselves. Having the ham as the centerpiece of your table creates a focal point that says ‘celebration’ and sets the tone for a special meal. Don’t be shy about letting people admire your work before diving in!
Ingredients
Main
Honey Glaze
Optional Garnish
Instructions
Prepare Your Ham
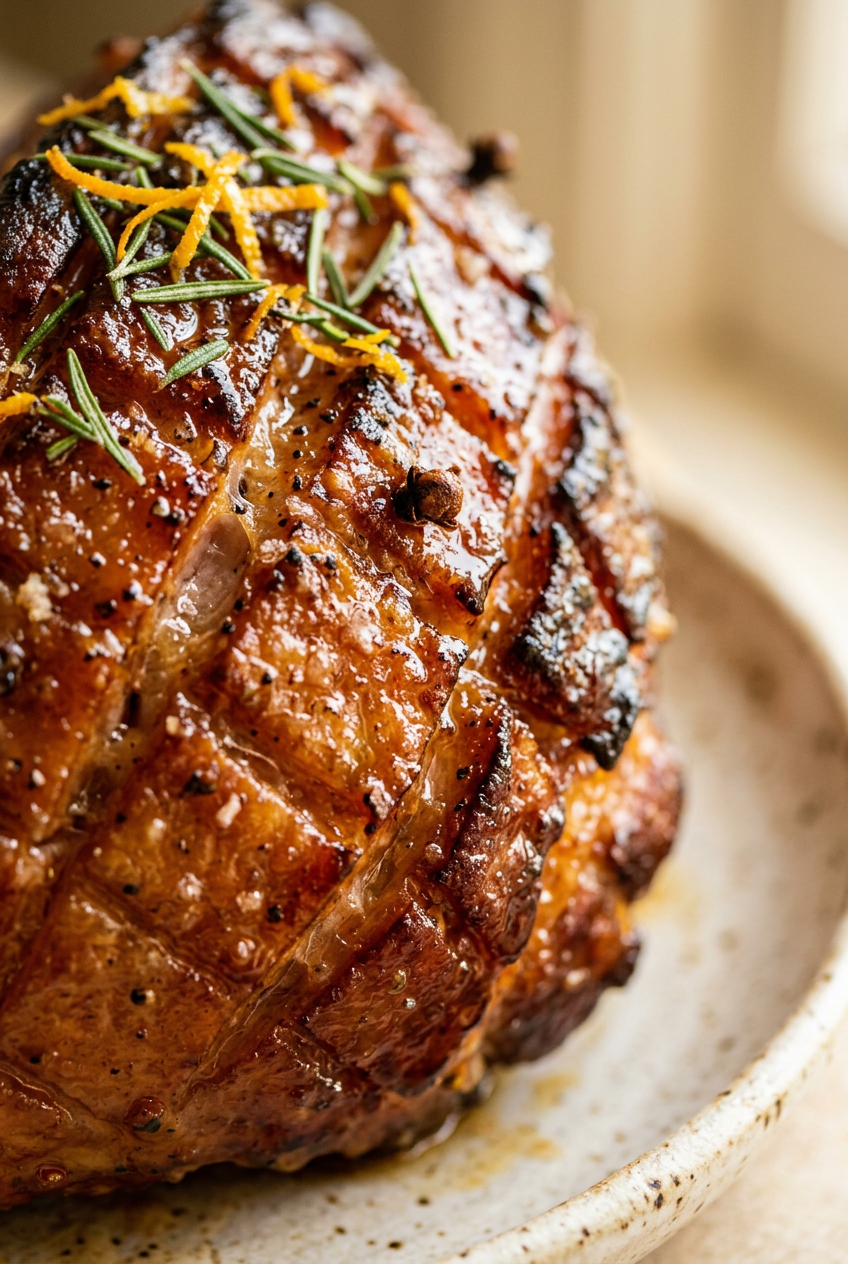
Preheat your oven to 325°F (163°C). Remove the ham from the refrigerator about 30 minutes before cooking to bring it closer to room temperature. This ensures more even cooking throughout. Place the ham cut-side down in a large roasting pan. If your ham is spiral-cut, you can place it cut-side up instead—just be mindful that some juices may escape. Using a sharp knife, score the surface of the ham in a crosshatch pattern, cutting about ¼ inch (6 mm) deep through the fat layer. This allows the glaze to penetrate and creates an attractive presentation. Don't cut into the meat itself, just the fat layer.
Add Liquid and Cloves
Pour the apple juice and water into the bottom of the roasting pan around the ham. This creates steam that keeps the meat moist during the long baking process. Stud the scored surface with whole cloves, placing one clove at each intersection of your crosshatch pattern. The cloves add a wonderful aromatic quality and subtle spice that's quintessentially Easter. Cover the roasting pan tightly with aluminum foil, ensuring the edges are sealed. This traps the moisture and prevents the ham from drying out during the initial cooking phase.
Initial Baking
Place the covered ham in the preheated oven and bake for approximately 2 hours and 15 minutes. The general rule is about 15 minutes per pound (450 g). You'll know it's ready for glazing when a meat thermometer inserted into the thickest part (not touching bone) reads 140°F (60°C). The ham is already fully cooked when you purchase it, so we're really just heating it through and infusing it with flavor. About halfway through cooking, you can carefully remove the foil and baste the ham with the pan juices if desired, though this isn't strictly necessary.
Prepare the Glaze
While the ham is baking, prepare your honey glaze. In a medium saucepan over medium heat, combine the honey, brown sugar, Dijon mustard, apple cider vinegar, ground ginger, ground cloves, and cayenne pepper. Stir constantly until the mixture is smooth and the brown sugar has completely dissolved, about 3-4 minutes. The mixture should be glossy and fragrant. Remove from heat and stir in the melted butter until fully incorporated. Taste the glaze and adjust seasonings if needed—you want a balance of sweet, tangy, and spiced flavors. Set aside to cool slightly before applying to the ham.
Apply the Glaze
Remove the ham from the oven and carefully peel back the foil. Increase the oven temperature to 400°F (204°C). Using a pastry brush or basting brush, generously apply the honey glaze all over the scored surface of the ham, working it into the crosshatch cuts. This is where the magic happens—the glaze caramelizes beautifully and creates that gorgeous mahogany exterior. Return the ham to the oven, uncovered, and bake for an additional 30-45 minutes, basting with the remaining glaze every 10-15 minutes. This repeated basting creates multiple layers of caramelized sweetness and ensures an even coating.
Add Decorative Toppings (Optional)
About 15 minutes before the ham is finished cooking, you can add decorative pineapple rings and maraschino cherries if desired. Secure them with toothpicks or small skewers, placing them strategically across the ham's surface. This is a classic presentation that looks absolutely stunning on the Easter table. The pineapple will caramelize slightly in the oven, adding another layer of flavor. If you prefer a more modern presentation, you can skip this step and simply garnish with fresh rosemary sprigs just before serving.
Rest and Serve
Remove the ham from the oven when the glaze is deeply caramelized and the internal temperature reaches 140°F (60°C). Let the ham rest for 10-15 minutes before carving. This resting period allows the juices to redistribute throughout the meat, ensuring moist, tender slices. Transfer the ham to a large cutting board or serving platter. If you'd like to make a pan sauce, pour the drippings from the roasting pan into a saucepan, skim off excess fat, and simmer gently. Carve the ham into thin slices and arrange on a serving platter. Drizzle with any remaining glaze and pan sauce. Serve warm or at room temperature with your favorite Easter sides.
Storage and Leftovers
Any leftover ham should be wrapped tightly and refrigerated for up to 5 days. It's absolutely delicious in sandwiches, salads, or chopped into fried rice. You can also freeze leftover ham for up to 2 months. The ham bone makes an excellent base for a flavorful broth or split pea soup—don't throw it away! Simply simmer it with water, aromatics, and vegetables for a few hours to create a rich, savory stock that's perfect for soups and stews.
Nutrition Information
Per serving (serves 14). Values are approximate.
| Calories | 285 calories |
| Total Fat | 12g |
| Saturated Fat | 4g |
| Carbohydrates | 18g |
| Sugar | 16g |
| Protein | 32g |
| Sodium | 1240mg |
| Fiber | 0g |
* Percent Daily Values are based on a 2,000 calorie diet. Your daily values may be higher or lower depending on your calorie needs. Nutritional information is an estimate and may vary.
Never Miss a Recipe
Join 5,000+ home cooks and get new recipes straight to your inbox.
Frequently Asked Questions
How far in advance can I prepare the ham?
You can prepare the ham up to 24 hours in advance. Score it, place it in the roasting pan with the liquid, cover it tightly with foil, and refrigerate. When you're ready to cook, simply add about 15-20 minutes to the total cooking time since it's starting from a cold temperature. The glaze can be made up to 3 days ahead and stored in an airtight container in the refrigerator—just gently reheat it before applying.
What's the difference between a bone-in and boneless ham?
Bone-in hams have more flavor and are generally more impressive for holiday presentations, though they yield less meat per pound. Boneless hams are more convenient to carve and have higher meat-to-weight ratio. Both work beautifully with this recipe—just adjust cooking time slightly. A boneless ham of the same weight will cook about 10-15 minutes faster. I personally prefer bone-in for Easter because it looks stunning on the table and the bone adds wonderful depth to the flavor.
Can I use a different type of glaze?
Absolutely! This recipe is very versatile. You can substitute the honey with maple syrup for a deeper flavor, use orange juice instead of apple juice, or add bourbon or rum for an adult version. Some people love a spicy kick with more cayenne or fresh jalapeños. The beauty of ham is that it pairs well with sweet, savory, and spiced flavors. Feel free to experiment based on your family's preferences.
How do I know when the ham is done cooking?
Since ham is already fully cooked when you purchase it, you're mainly heating it through. The internal temperature should reach 140°F (60°C) when measured with a meat thermometer in the thickest part, not touching bone. If you're cooking a fresh (uncured) ham, you'll need to cook it to 160°F (71°C). The ham is also done when it's heated through and the glaze is beautifully caramelized and sticky.
What size ham should I buy for my guest count?
Plan for about ¾ pound (340 g) of bone-in ham per person, or ½ pound (227 g) of boneless ham per person. For 12-14 guests, an 8-10 pound (3.6-4.5 kg) bone-in ham is perfect. If you're expecting 16-18 people, go for a 12-14 pound (5.4-6.4 kg) ham. Remember that leftover ham is wonderful, so don't hesitate to buy a slightly larger ham if you want plenty of leftovers for sandwiches and other dishes.

Hi, I'm Lisa!
I create simple, tested recipes from around the world that anyone can make at home.
Learn More →Reader Reviews
Based on 287 reviews